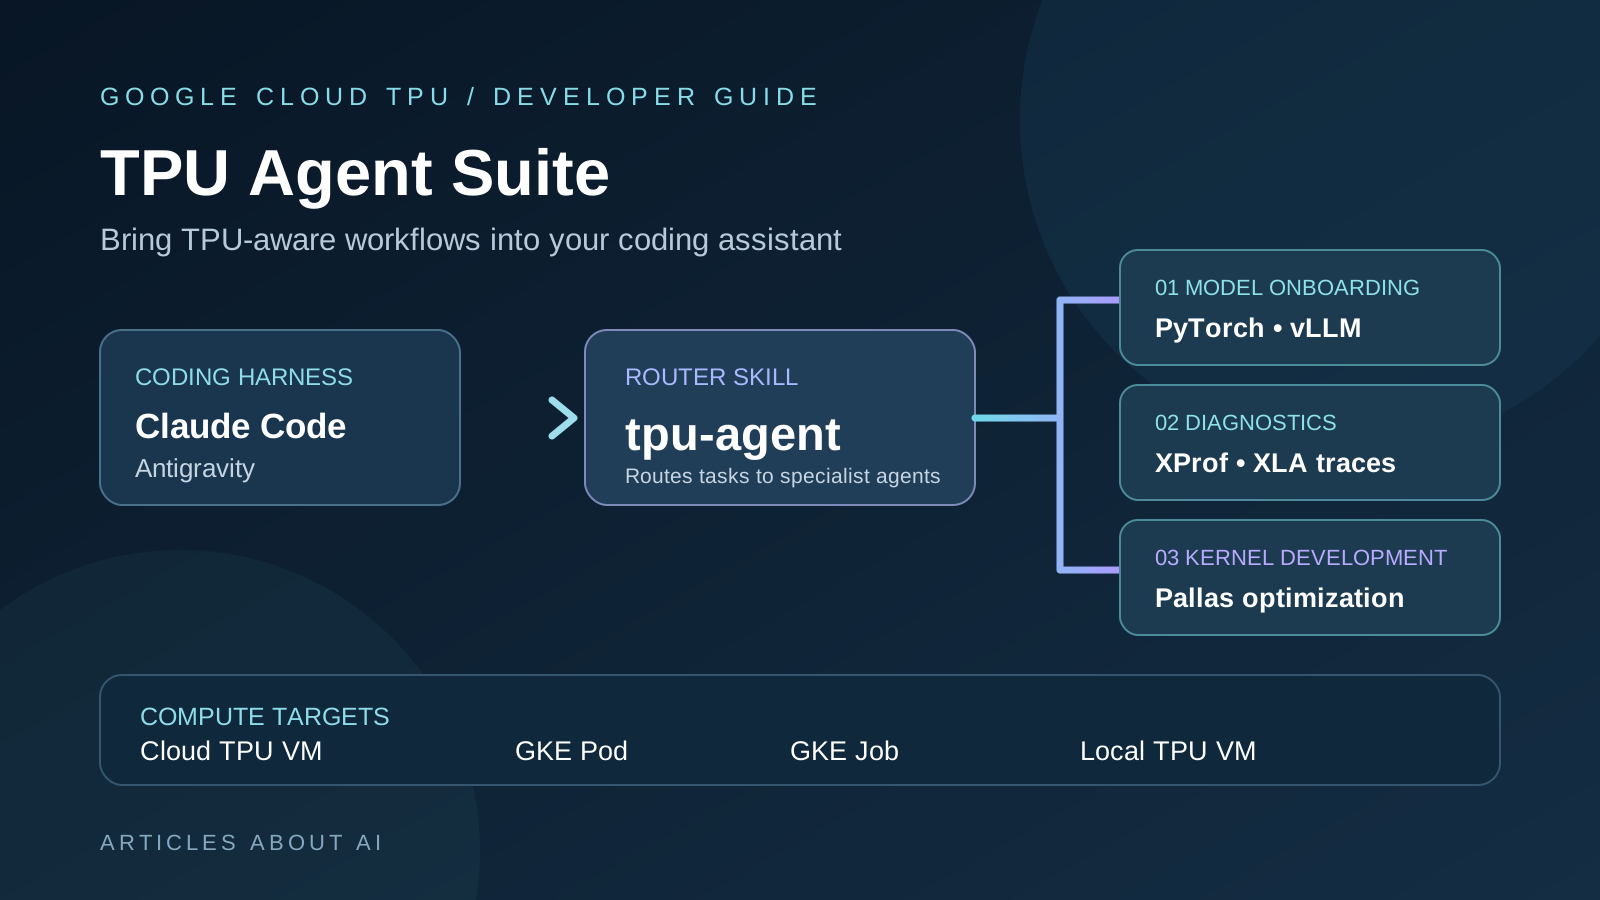
Google’s TPU Agent Suite is an open-source preview that adds TPU-specific skills and specialist agents to supported coding assistants. Instead of asking a general-purpose coding agent to guess at TPU topology, XLA settings, XProf traces, or Pallas kernel constraints, developers can use a dedicated tpu-agent entry point to route work to focused workflows for model onboarding, diagnostics, kernel development, and cited hardware documentation.
This guide explains how to install the suite, connect it to Claude Code or Google Antigravity, configure a Cloud TPU execution target, and run a first model-onboarding or profiling task. It is a hands-on guide to the preview—not an announcement that the suite first launched on November 9. Google’s initial public announcement appeared in its October 20, 2026 TorchTPU post, and Google Cloud Tech published a dedicated overview on October 28. Google referenced the suite again in its November 9 TPU platform update. Google’s launch post and the TPU Agent Suite repository are the primary references.
If you are comparing coding-agent platforms beyond TPU-specific workflows, see our guide to Microsoft Copilot Harness in Foundry.
What is Google TPU Agent Suite?
TPU Agent Suite is a package of declarative agent skills, routing instructions, tools, and a runtime for helping developers build and optimize PyTorch inference workloads on Google Cloud TPUs.
You interact with one top-level skill, tpu-agent. It routes a request to the specialist responsible for the task rather than requiring you to remember every sub-agent name.
The current repository describes four specialist workflows:
| Specialist | What it helps with |
|---|---|
tpu-model-onboarding |
Porting a Hugging Face PyTorch model, checking accuracy, preparing inference, and benchmarking |
tpu-diagnostics |
Inspecting crashes, XProf profiles, compiler traces, memory bottlenecks, and utilization |
tpu-kernel-development |
Developing and tuning custom Pallas kernels within bounded optimization runs |
tpu-knowledge-base |
Answering TPU hardware and runtime questions with citations to official documentation |
The router selects a specialist based on the request. The repository says the router itself does not run compute commands; the specialist workflow handles the task and asks for required setup information.
What you need before installing
Prepare the host machine where Claude Code or Antigravity runs:
- Python 3.12 or newer.
- A Python virtual environment.
- The TPU Agent Suite distribution for your coding harness.
- Host-side dependencies from the distribution’s
requirements-client.txt. - Google Cloud CLI (
gcloud) when connecting to a Cloud TPU VM or Google Cloud APIs. kubectlandgke-gcloud-auth-pluginfor GKE Pod or Job backends.- Access to a supported Cloud TPU environment for actual TPU workloads.
The installer can be installed without a TPU attached, but model onboarding, profiling on hardware, and TPU kernel benchmarking need a configured compute target. Cloud TPU VM and GKE resource usage can incur separate Google Cloud charges; the agent package itself does not provide free accelerator capacity.
Step 1: Choose a supported coding harness
The repository’s installation guide currently publishes prebuilt release archives for:
- Claude Code
- Google Antigravity
The source repository also documents building distributions for Codex and Cursor, but the install guide distinguishes those from the prebuilt release archives. Do not assume a ready-made archive exists for every harness. If you need Codex or Cursor, follow the repository’s build instructions and verify the generated distribution before installing it.
Start with the official TPU Agent Suite GitHub repository, open Releases, and download the archive matching your harness. The archive name follows this pattern:
tpu-agent-suite-<harness>-v<version>.tar.gz
Replace the placeholders with the actual harness name and version shown on the Releases page. Do not copy a version number from an old tutorial without checking the current release.
Extract the archive:
tar -xzf tpu-agent-suite-<harness>-v<version>.tar.gz
Step 2: Create a Python environment
Use a dedicated environment so the suite’s client dependencies do not conflict with other Python projects.
python3 --version
python3 -m venv .venv-tpu-agent
source .venv-tpu-agent/bin/activate
python -m pip install --upgrade pip
On Windows, activate the environment with:
.venv-tpu-agent\Scripts\Activate.ps1
Install the host-side dependencies included in the extracted distribution:
python3 -m pip install -r tpu-agent-suite-<harness>-v<version>/requirements-client.txt
Keep this environment activated whenever you launch the coding assistant and use the suite. The repository notes that PyYAML is enough for the compiler and installer, but the client requirements are needed for the agents’ runtime dependencies, including XProf-related workflows.
Step 3: Install TPU Agent Suite into your project
Open a terminal at the root of the project where you want the agent skills and instructions to be available. With the virtual environment active, run:
python3 tpu-agent-suite-<harness>-v<version>/framework/installer.py install --destination /path/to/your/project
Replace /path/to/your/project with the real project directory.
For a user-wide installation across projects, the documented installer supports:
python3 tpu-agent-suite-<harness>-v<version>/framework/installer.py install --scope user
The installer manages files belonging to the package and avoids overwriting unmanaged or locally modified files unless you explicitly pass --force. Do not add `–force simply to make an installation error disappear; inspect the conflict first.
What the installer adds
For Claude Code, the project installation includes the tpu-agent skill, compiled specialist-agent instructions, settings, a managed block in CLAUDE.md, and a .tpu-agent-suite/ configuration directory. Other harnesses use their corresponding native instruction and configuration locations.
The runtime and package data are stored under the user’s ~/.tpu-agent-suite/ directory. Run artifacts are written beneath:
~/.tpu-agent-suite/runs/<run_id>/artifacts/
The exact harness-specific files are documented in the repository’s installation guide.
Step 4: Authenticate with Google Cloud
For a Cloud TPU VM backend or workflows that access Google Cloud APIs, install and configure the Google Cloud CLI first. Then authenticate:
gcloud auth login
gcloud auth application-default login
For GKE workloads, install the GKE authentication plugin:
gcloud components install gke-gcloud-auth-plugin
Then obtain credentials for the cluster you intend to use:
gcloud container clusters get-credentials <CLUSTER_NAME> --region=<REGION>
Use the correct project, region, cluster, and identity for your environment. Authentication is not the same as authorization: your Google Cloud identity still needs the IAM permissions required to inspect or use the selected resources.
Step 5: Configure a TPU compute backend
The first time you start a TPU task, the agent asks which compute backend you want to use and collects the relevant settings. The documented backends include:
| Backend | Where the workload runs | Typical use |
|---|---|---|
local |
On the TPU VM where the coding harness is running | Direct development on a TPU VM |
gce_tpu_vm |
On a remote Cloud TPU VM | Workstation-to-TPU-VM workflow |
gke_pod |
Inside an existing TPU pod | Working with a running Kubernetes workload |
gke_job |
In a Kubernetes Job | Dispatching a TPU workload to GKE |
For a remote TPU VM, the setup needs the TPU name, zone, and Google Cloud project. A GKE pod setup needs a namespace and pod name, while a GKE Job also needs the appropriate image, accelerator, and topology information.
Do not guess TPU names, zones, accelerator types, or topology strings. Get them from your provisioned environment or cluster administrator. The suite checks the configured target before running compute work.
Prepare the TPU VM Python environment
For the documented Cloud TPU VM path, the installation guide uses Python 3.12 and torch_tpu. The package installs a compatible PyTorch build, so the guide explicitly warns not to install PyTorch manually before torch_tpu.
Example commands on the TPU VM:
sudo apt update
sudo apt install -y python3.12 python3.12-venv

python3.12 -m venv ~/tpu_venv
source ~/tpu_venv/bin/activate
python -m pip install --upgrade pip

pip install torch_tpu
pip install -r tpu-agent-suite-<harness>-v<version>/requirements-tpu.txt
pip install portpicker marimo scikit-learn pandas tensorboard

tpu-info
The final check verifies that the TPU tooling can see the device. The repository also documents a PyTorch allocation check:
python3 -c "import torch, torch_tpu; torch.zeros(1, device='tpu'); print('TPU Device OK:', torch.device('tpu'))"
Run these commands only in an environment that actually has the relevant TPU drivers and hardware. A successful package installation on an ordinary laptop does not mean a TPU is available.
Step 6: Run your first model-onboarding task
Launch Claude Code or Antigravity from the project directory while the virtual environment is active. The suite activates its top-level tpu-agent skill when it recognizes a relevant TPU request.
A useful first request is specific about the model, backend, accelerator, and desired result:
Check my configured Cloud TPU environment. Then onboard
Qwen/Qwen3-32B for inference on Cloud TPU using vLLM and
the torch_tpu backend. Use the TPU topology already configured
for this project. Run a small test completion, verify the output,
and report any unsupported operators or setup problems.
Do not launch a long benchmark or change cluster resources
without showing me the planned commands first.
The repository’s own examples use model onboarding, serving, and benchmarking prompts. The agent may ask follow-up questions if the model repository requires authorization or if the compute profile is incomplete. For gated Hugging Face models, provide a valid HF_TOKEN in the environment before starting the coding assistant.
A good first run should produce a clear record of:
- The model and revision selected.
- The compute backend and TPU target.
- Any unsupported operators or compatibility issues.
- Whether the model loaded successfully.
- The result of a test completion.
- Any benchmark command and its measured output.
Do not treat a model as successfully onboarded just because the agent generated a script. Look for a completed run, a successful test request, and the actual logs or artifacts.
Step 7: Use the diagnostics agent with XProf
If you already have an XProf profile, ask the agent to analyze it:
Analyze the XProf profile at /path/to/profile.
Identify the main memory bottlenecks, TPU compute utilization,
and the operations that dominate execution time.
Return a prioritized list of findings and cite the relevant
profile evidence. Do not modify the model or rerun workloads.
You can also ask the suite to capture a profile as part of a bounded benchmark workflow. Make the number of profiling runs and the expected output explicit. XProf analysis runs on the host environment configured for the suite; ensure its dependencies are installed in the active Python environment.
Step 8: Optimize a custom Pallas kernel
The kernel-development workflow can help with custom Pallas TPU kernels. Start with a narrow request and a measurable target:
Review the Pallas kernel in ./kernels/my_attention.py.
Explain the current implementation and identify the likely
bottleneck before changing code. If optimization is justified,
propose one change at a time, run no more than three benchmark
iterations, and report correctness checks and latency for each
attempt. Do not replace the original file without my approval.
Pallas optimization is hardware- and workload-dependent. A faster microbenchmark does not automatically mean a faster end-to-end model. Require correctness checks and compare the same input shapes, data types, and execution conditions before accepting a change.
Step 9: Understand approvals, outputs, and privacy
TPU Agent Suite can run commands against a local environment, a TPU VM, or a GKE cluster, depending on the selected backend. Review the planned actions before approving commands that create resources, submit jobs, alter files, or consume accelerator time.
The repository describes diagnostic workflows as read-only by default and uses approval gates for compute actions. Still, treat every proposed shell command and cloud operation as something to inspect. Apply least-privilege IAM permissions and avoid putting access tokens, service-account keys, or private model credentials in prompts or source files.
Run outputs and benchmark artifacts are saved under the run-specific artifacts directory. The package also supports optional trajectory export for debugging. Trajectory sharing is off by default; if enabled, the bundle can include transcripts, environment configuration, and artifacts. It is not automatically redacted. Only export to a storage destination you control, and do so after reviewing what will be included.
Common problems and fixes
The agent does not activate
Confirm that the package was installed into the project you opened, that you launched the supported harness from that workspace, and that the required virtual environment is active.
The installer reports a Python or dependency error
Check python3 --version, activate the intended virtual environment, and reinstall the distribution’s requirements-client.txt. Do not install dependencies into a different interpreter from the one used to launch the coding assistant.
The TPU is not detected
Run tpu-info on the TPU VM or inside the intended TPU container. Check that torch_tpu and the TPU runtime are installed in the interpreter selected by the compute profile.
GKE commands fail
Verify the active kubectl context, namespace, cluster credentials, and gke-gcloud-auth-plugin. Make sure the Google Cloud identity has the necessary permissions and that the TPU workload can be scheduled on the selected cluster.
A model download fails
Some Hugging Face repositories require authentication. Export HF_TOKEN before starting the harness, confirm that the account can access the model, and check available disk space on the compute target.
The first run is slow
The first run may download model weights and compile TPU programs. Later runs can reuse cached model files depending on the backend. On GKE Job backends, the repository documents configuring a shared ReadWriteMany cache claim to avoid downloading model weights for every job.
TPU Agent Suite vs a general-purpose coding agent
A general-purpose coding assistant can write Python, explain errors, and use tools, but it may not have the latest TPU-specific knowledge or structured workflows. TPU Agent Suite adds a TPU knowledge base and specialist workflows for model onboarding, diagnostics, and Pallas kernel development.
It does not replace Claude Code or Antigravity. It extends the supported harness with TPU-focused capabilities. It also does not provision free compute: developers still need an eligible Google Cloud TPU environment, permissions, and a compatible software stack.
FAQ
Is Google TPU Agent Suite free?
The project is open source under the repository’s Apache-2.0 license. However, using it with Cloud TPU VMs or GKE can incur separate infrastructure, storage, and network charges.
Which coding assistants have prebuilt distributions?
The current installation documentation lists prebuilt release archives for Claude Code and Google Antigravity. The source repository documents building Codex and Cursor distributions from source; check the current release notes before assuming those archives are available.
Does TPU Agent Suite work on a normal laptop without a TPU?
You can install the package and explore its local tooling, but real model onboarding, TPU profiling, and kernel benchmarking require a configured TPU compute target.
Does it support PyTorch?
Yes. The suite focuses on PyTorch inference workflows on Cloud TPU, using the torch_tpu stack and supported serving paths such as vLLM-TorchTPU.
Can it modify my cloud cluster automatically?
The suite can run compute workflows through configured backends, but actions that execute commands or affect cloud resources should be reviewed and approved. Use least privilege and inspect the proposed commands.
Where are the reports and benchmark results saved?
The default artifacts location is ~/.tpu-agent-suite/runs/<run_id>/artifacts/. Each run also maintains a journal and experiment summary alongside its artifacts.
Official sources
- Google Cloud: TorchTPU is now open source and the TPU Agent Suite is in early preview
- Google Cloud TPU Agent Suite GitHub repository
- TPU Agent Suite installation guide
- TPU Agent Suite usage guide
- Google Cloud TPU documentation: PyTorch on Cloud TPU
- Google Cloud: November 9 TPU platform update
The practical takeaway: install the harness-specific distribution, configure a real TPU backend, start with a narrowly scoped onboarding task, and require evidence from test completions and profiling artifacts before accepting an optimization.